Today I have a quick little makeover to share with you. I don't think anything is ever really "finished" around here, there's always room for improvement! I've shared this little spot with you before...
Remember the antique chest that I picked up from our neighbor's curb then made a new faux marble top for it? And the abstract art canvas that I painted and layered a wrapped foam board behind it to bulk it up a bit? Well that spot got another upgrade last week, once again a case of "one man's trash is another (wo)man's treasure!
If you follow me on Facebook or Instagram you might have seen my video talking about this little project as it was happening, but I'm sharing the finished product for the first time here today. After the Christmas decorations are packed back away, the first of the year always brings the desire to change things up a bit. After taking down the Christmas wreath that was hung over that chest, I was reminded that I really needed to be on the lookout for a large canvas or frame that I could add to that spot. That was always my original inspiration for the space, I just hadn't come across the right thing at the right price yet, and had made do the best I could in the meantime.
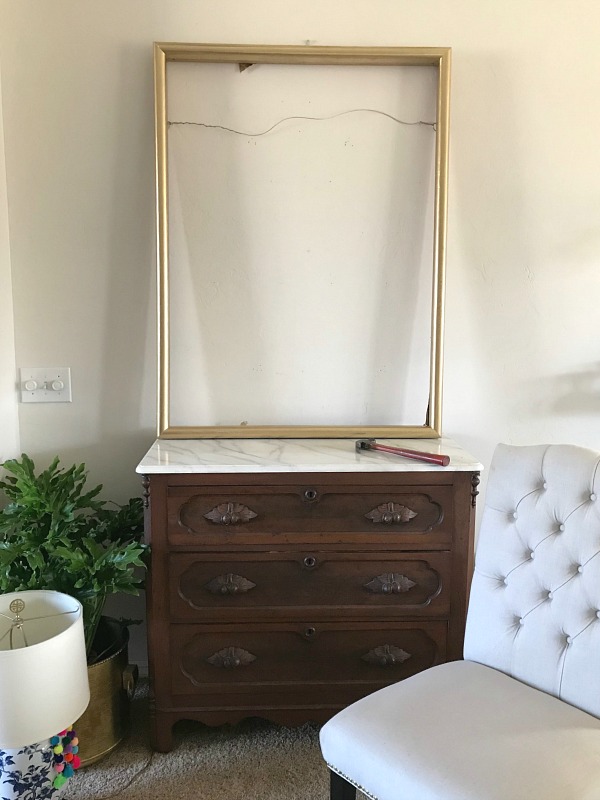
So with those thoughts spinning through my head one unseasonably warm day after New Year's while the kids were still home, Emily and I took a spin around the neighborhood in the golf cart. And it was big trash day! (Once a month our city allows for large items to be set out to be collected- I always take a sloooow drive around the neighborhood on those days...ha!) We whizzed by one house with a large picture set out on the curb, and as we kept going I thought "Huh, that frame looked pretty big!". So I made Emily go back and we checked it out and proceeded to load it up on the back of the golf cart and drive back across the neighborhood with it... wish I had a photo of that! ;)
It was definitely in sad shape and not pretty at all, but it was wood and huge (about 4 feet tall!) and heavy and I could tell that it had been an expensive frame. I checked the measurements and to my delight the proportions were just right for my abstract canvas. So, I moved fast and took advantage of the warm temps that day and got busy with my favorite gold spray paint.
The frame was so heavy that I took the opportunity while it was still empty and added the hardware to the back, then found the right spot to hang it while I could easily see where to put the nail.
I needed a solid back for the frame so I could attach the canvas to it, so I found a thin but sturdy piece at Home Depot and had them cut it to size for me. I still really liked the polka dot fabric that I already had behind the canvas, so I unwrapped it from the piece of foam board that I had been using and attached it with spray adhesive to the new backing board. The frame already had metal tabs around the back to bend down and secure the back, so I was able to easily install it and hold the board in place. Then I just used two nails (or push pins would have worked) in the board to hang the canvas on the front.
That's it! A fairly easy project for a nice upgrade to this space.
Now I feel like the piece is the appropriate size for that wall and has a much more polished look.
The 4" thickness of the frame is really nice because the layered canvas nestles inside there instead of laying on top.
Side note: I wanted to show you this cool plant! I needed something new for my head planter and while there wasn't a great selection at Lowe's or Home Depot right now, I found this "Rainbow Moss" that's good for low light areas. I tried to capture the pretty color, can you see the variation of almost a turquoise blue in some of the leaves?
Yay for kicking off the year with quick, easy upgrades! I have several mini-makeovers and a few room overhauls planned this year, excited to walk through them with you!
(*This post contains affiliate links, read my full disclosure policy here.)
SHOP MY SPACE
SIMILAR ABSTRACT ART
Never miss a post!
Subscribe to Dimples and Tangles and receive notice in your inbox each time a new post is published. Click here to subscribe!


Love this. You are so smart and creative; thanks for sharing your spaces and ideas with us!
ReplyDeleteThank you Jennifer, I hope it sparks some ideas of your own! :)
DeleteHi Jennifer, great work! The frame looks lovely. Thanks for sharing!
ReplyDeleteLove this Jennifer. I always look forward to every one of your posts! Can't wait to see what this year brings! OH! Forgot to tell you that I did your big display wall ( like your botanicals in your breakfast room) over the sofa in my living room, which has a high ceiling. It turned out great and I get lots of compliments on it!
ReplyDeleteOh, I love hearing that! It's such a good way to fill a large wall. So glad you love how it turned out!
DeleteYou are right -- it certainly looks very polished. I get so many great ideas from your blog (as a sister color lover) and now I need to go poke through my attic. I think there are frames in there...
ReplyDeleteLove this! You are so creative!
ReplyDelete